Showing posts with label Ranger Distress Paints. Show all posts
Saturday, March 28, 2015
12 Tags of 2015 with Tim Holtz-March
Greetings from Southeast Arkansas where winter is stuck LOL! I'm so thankful for my warm and cozy craft room!
Don't you just love Tim's March Tag? Once again I don't have the exact supplies that Tim used so I improvised. Now normally I make a tag but this month I've made a gift for a very dear Friend.
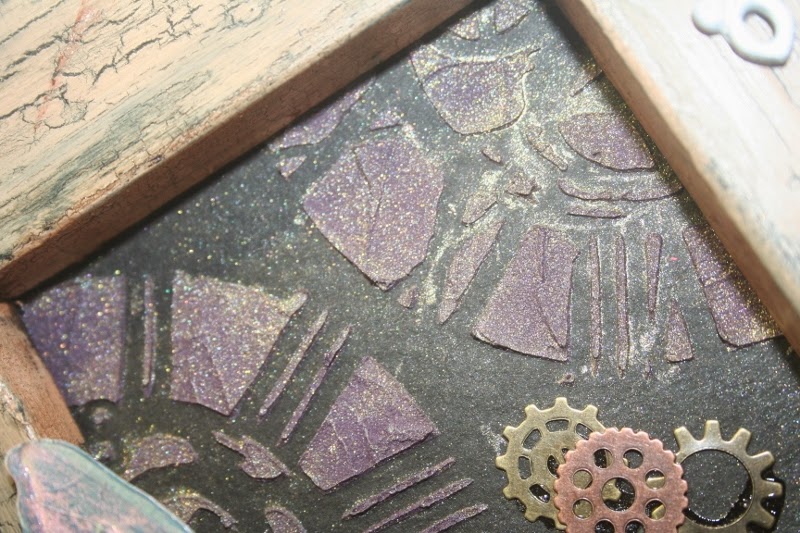
I built a wood frame, painted it black and then coated the black with DecoArt Weathered Wood medium. Once the medium was dry I applied a coat of DecoArt Mocha Acrylic paint and sat and watched the beautiful cracks appear.
Next I cut a piece of black matboard and used Tim's Clock Stencil along with some opaque texture paste that I had mixed some purple acrylic paint into. Applied to the matboard and dusted with some Ranger Pearl Ex Powder.
I cut and embossed the Dragonfly using Tim's Layered Dragonfly Die, colored her up with pearlex powders, added some half pearls to her tail then covered her completely with Ranger Glossy Accents.
Before I adhered the Dragonfly to the frame, I gave the whole frame a coating of Rangers Glue n Seal and once it was dry I did some antiquing all over the frame with some of Tim's Black Soot Distress Paint. Apply the distress paint , wait about 30 seconds then rub it back with a soft cloth until you get the desired look. I appllied some Picket Fence Distress Paint to one of Tim's keyholes, waited a few seconds and did a quick light rub with a soft cloth.
I really enjoyed making this, at first I felt funny not doing a tag but Tim does encourage us to take inspiration from his and run with it...I ran LOL Thank you for looking. Now I must get this boxed up and mailed off to put a bit of happy in a dear Friend's day.
Don't forget to head to Tim's Blog and join in on the fun!
Friday, December 27, 2013
12 Tags of 2013 with Tim Holtz-December
I hope You all had a wonderful Christmas! Our's was very quiet, this year we didn't have any of our Kids or Grands here and I almost didn't even decorate. Tim's December Tag actually got me into the mood to put a tree up and decorate a bit...I'd say his tag was a double inspiration for me this month!
I was anxious to use Tim's "Shatter" Layering Stencil and I love it! I need more practice with the Clearly For Art from Wendy Vecchi..my Poinsettia didn't turn out quite the way I was wanting it to.
I stained my Tag with Iced Spruce Distress Stain, then laid the stencil on top and pounced Picket Fence Distress Paint all over (I just can't stress how much I LOVE these Distress Paints!). Once dry I stamped some of Tim's small snowflake stamps with Salty Ocean and Broken China Distress inks, while the inks were still wet I sprinkled some Sticky Powder on the stamped area, dried it then added some gorgeous Clear Rock Candy Distress Glitter. I stamped the phrase "A Joyful Christmas" using Tim's stamp and Black Archival Ink. I used the movers and shapers Poinsettia and Holly Leaf Dies to cut the white Clearly For Art (I must invest in some of the clear!), I painted the cut shapes with Distress Paints in Bundled Sage and Victorian Velvet. I used Glossy Accents to adhere the poinsettia and holly leaves and finished the tag off with some of Tim's lovely seam binding. I'm thinking this would have made a lovely gift Tag so I hope I remember to make a bunch of them up next year for the gifts.
I absolutely love Tim's Tag but I'll need to order some of the Clear CFA , the Frosted Film and the larger Poinsettia Die first. Be sure to check Tim's Blog to see his masterpiece!!!
Thank you for looking :-)
I was anxious to use Tim's "Shatter" Layering Stencil and I love it! I need more practice with the Clearly For Art from Wendy Vecchi..my Poinsettia didn't turn out quite the way I was wanting it to.
I stained my Tag with Iced Spruce Distress Stain, then laid the stencil on top and pounced Picket Fence Distress Paint all over (I just can't stress how much I LOVE these Distress Paints!). Once dry I stamped some of Tim's small snowflake stamps with Salty Ocean and Broken China Distress inks, while the inks were still wet I sprinkled some Sticky Powder on the stamped area, dried it then added some gorgeous Clear Rock Candy Distress Glitter. I stamped the phrase "A Joyful Christmas" using Tim's stamp and Black Archival Ink. I used the movers and shapers Poinsettia and Holly Leaf Dies to cut the white Clearly For Art (I must invest in some of the clear!), I painted the cut shapes with Distress Paints in Bundled Sage and Victorian Velvet. I used Glossy Accents to adhere the poinsettia and holly leaves and finished the tag off with some of Tim's lovely seam binding. I'm thinking this would have made a lovely gift Tag so I hope I remember to make a bunch of them up next year for the gifts.
I absolutely love Tim's Tag but I'll need to order some of the Clear CFA , the Frosted Film and the larger Poinsettia Die first. Be sure to check Tim's Blog to see his masterpiece!!!
Thank you for looking :-)
Thursday, October 17, 2013
12 Tags of 2013 with Tim Holtz-October
Woohooo, Fall is finally here! I was beginning think that it was never coming to the southeast! I love Tim's background technique for his Oct. tag and had fun creating my own. I still haven't got any Distress Glitter so had to improvise there. I can't wait to get my hands on some of that Distress Glitter! For this Tag I used Distress Paints, Distress Ink, Tim's Framed Silhouettes Stamps and Dies, Tim's cool Tinsel and Tim's chit chat stickers. You can see Tim's gorgeous Tags for this month on his Blog.
Saturday, October 12, 2013
Playing with Birdcage CC102 with Tim Holtz Day 5
I couldn't wait to use the Tarnished Birdcage, I added some ribbon that I partially painted with Distress Paint and stamped the word imagine at the bottom.
CC102 with Tim Holtz-Day5 Shabby Chic
I just adore this technique! I've got some ideas for tags, cards and home decor using this one.
Because of the weather I can't get a photo yet that shows the colors, this piece is a muted pink and blue believe it or not :-) Want to learn this? Check out CC102 at OnlineCardClasses!
Labels:
CC102,
Ranger,
Ranger Distress Paints,
Ranger Embossing Powder,
Sizzix,
Tag,
Tim Holtz
CC102 with Tim Holtz-Day5 Tarnished Silver
OH boy, here's another technique that I will be using quite often! I love the look!!
and a little close up:
If you want to know how to do this, run to OnlineCardClasses and sign up for CC102 with Tim!
and a little close up:
If you want to know how to do this, run to OnlineCardClasses and sign up for CC102 with Tim!
Haunted House Tag
I woke up to a stormy fall day, ready to do some homework for my Tim Holtz CC102 Class. For this Tag I decided to use 3 of the techniques we've just learned. I used the Distress Paint Marbling and Colored Crackle from Day 1 along with the Faux Cracked Glass from Day 3.
Happy Hallowe'en!
Happy Hallowe'en!
CC102 with Tim Holtz-Day3
I'm still waiting on some supplies to come in for Day 3, 4, and 5 classes but was able to complete three of the day 3 techniques without those supplies. I've been stalking my mailbox and it sure doesn't make the orders come in any quicker LOL
Here is my tag for the Smudge Stamping Technique:
I enjoyed it so much I tried another:
Here is the Brayered Stains Technique:
Here is the Faux Cracked Glass Technique (can't wait to try this on a larger scale!):
Here's hoping my orders show up tomorrow so I can do the rest of the techniques :-)
Thanks for looking!
Thursday, October 10, 2013
CC102 with Tim Holtz-Day2
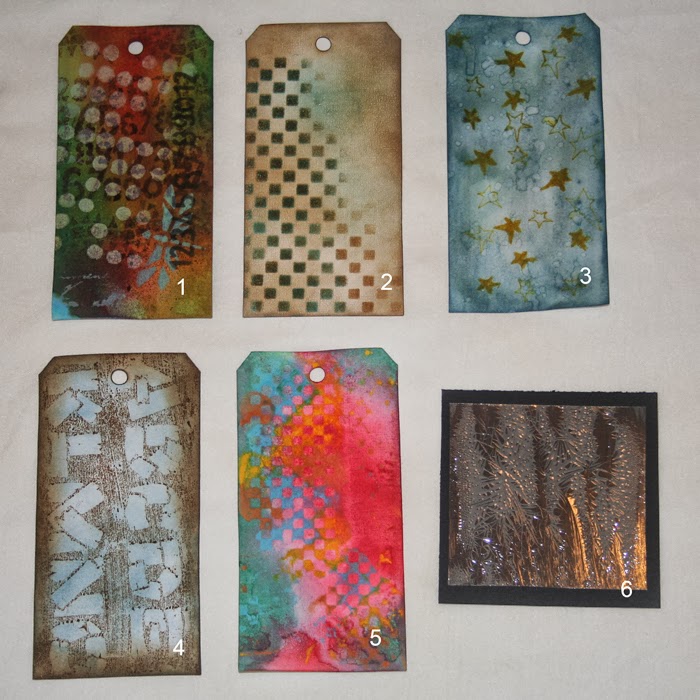
WOW! I just can't tell Ya'll how exciting this class is! Like many others I didn't have all of the supplies on hand that Tim used so I'm a wee bit behind on my homework...but I'm staying at it and hopefully tomorrow my other supplies will be here so I can catch up. Here is a group shot of what I've done for day 2 so far:
1. Mixed Media
2.Embossing through
3.Stencil Sketching
4.Ink Monoprint
5.Paint Monoprint
6.oops, this is Faux Cracked Glass and it's actually for Day 3 (stay tuned for the rest of day 3)
If you want to learn how to really get the most out of your Distress Products, you really need to check out this class. You have lifetime access to these excellent lessons from Tim. Check it out at OnlineCardClasses .
Thank you for looking!
Tuesday, September 17, 2013
12 Tags of 2013 with Tim Holtz-Sept
Hello Fellow Crafters!
I've been away from crafting for a while, well actually from blogging about crafting. During July and August I was making some altered items for my Sons because in August I went to Canada for my Family Reunion! I got to spend 3 weeks with my Mom, my Siblings, my Sons and my Grandkids...it was wonderful!!! While there I also got to sit down with 2 of my GrandDaughters and teach them some paper crafting techniques...they were so adorable and had so much fun! I'm proud to say my GrandDaughters are naturals and I got them hooked on Tim Holtz, especially his Tattered Floral Die :-) Here is a photo of them , left to right are Macki, Krystyn and my Niece Carys.
I also taught my GrandDaughters and my youngest Son how to make homemade bread, they all did an awesome job and had fun doing it. Here's a pic of my youngest Son, Brandon's first loaf of bread
ok, one more photo if ya'll don't mind...many of you know my favorite pets are my ducks, many of my friends (and family) call me the Duck Lady LOL With that said, I just have to share this pic of my youngest Son feeding a wild Mallard Hen at the beach :-)
I have Pekins, Muscovies and Mallards...I've had my Mallard Gals for 5 yrs and they still won't eat out of my hand, this wild gal actually ate right out of my Son's hand..**proud Momma smile**
Ok enough personal stuff for now...on to the main reason for today's post...
If you haven't been to Tim's blog to see his September Tag, go check it out HERE
Don't you just love it?!!!! I was so tickled that he used my favorite Distress color Peacock Feathers!
As usual I had to do some improvising, as much as I wish I owned everything put out by Tim, it's just not possible (until I win a lottery LOL), I had also just ran out of embossing paste, YIKES!
I used lightweight spackle instead of embossing paste...in a pinch it does work, however it's not as good as embossing paste. I also don't have Tim's stencils...YET, so I used a Craft Companion stencil, a couple of Dyllusion stencils and a couple of Tim's rubber stamps instead. The chit chat stickers I used are from his Seasonal line, I chose to use Forever Friends and this tag is going to my best friend. I used Distress Ink in Walnut Stain, Black Soot and Picked Raspberry. I used Distress Stains in Wild Honey, Peacock Feathers. I used Picket Fence Distress Paint. The stamps I used are Tim's Papillon set and his honeycomb stamp from the Mixed Media Set. I also used the heart from his Idea-ology Classics Adornments set.
Thank you so much for looking,
Happy Crafting!
Michelle
Sunday, June 30, 2013
12 Tags of 2013 with Tim Holtz-June
Hello Crafty Friends!!
I'm running a bit behind this month because I've been preparing for a trip to Ontario, Canada to see my Mom, Siblings, my Sons and my Grandbabies :-) I don't leave until the first week of August but I've been scanning Family Photos for my Sons, making gifts to carry with me and well honestly just spinning in circles with excitement :-)
I'm glad I was able to get my scatterbrain in gear and finish my June Tag, I love doing the 12 Tags along with Tim and would have been upset if I'd missed out on one. You can follow along with Tim too! You can see his June Tag HERE on his blog. I have to say Tim's June tag is my favorite so far...I wish I had those Blueprint stamps but it's just not in the cards for me at this time so once again I had to improvise. Of course my favorite set of his stamps that I do have so far is the Papillon set...I adore this set!!!!!!! I did a lot of heat embossing with Distress Inks and with Archival Ink along with lots of Ranger Embossing Powders. I really wanted to try Tim's painted metal technique that he used HERE on his April Tag , I have all of the Distress Paints except the Metallics so I cheated/improvised again LOL I dabbed Distress Paints in Greens and Blues with my finger as Tim did, and zapped them with the heat gun to dry the paint.
Then I took some Tarnished Brass Distress Stain and dabbed it on, again zapping it to dry it. The Distress Stain adhered perfectly to the Distress Paint, woohooooooo!
I then colored some of Tim's wonderful seam binding with Distress Stain in Iced Spruce and Gathered Twigs (2 of my favorite Stains!!) and added my metal pieces with one of Tim's long fasteners.
I was tempted to take a black sharpie and add my own blueprint doodles to it but was worried I'd mess it all up and I've run out of time :-)
Thank you for looking!
I'm running a bit behind this month because I've been preparing for a trip to Ontario, Canada to see my Mom, Siblings, my Sons and my Grandbabies :-) I don't leave until the first week of August but I've been scanning Family Photos for my Sons, making gifts to carry with me and well honestly just spinning in circles with excitement :-)
I'm glad I was able to get my scatterbrain in gear and finish my June Tag, I love doing the 12 Tags along with Tim and would have been upset if I'd missed out on one. You can follow along with Tim too! You can see his June Tag HERE on his blog. I have to say Tim's June tag is my favorite so far...I wish I had those Blueprint stamps but it's just not in the cards for me at this time so once again I had to improvise. Of course my favorite set of his stamps that I do have so far is the Papillon set...I adore this set!!!!!!! I did a lot of heat embossing with Distress Inks and with Archival Ink along with lots of Ranger Embossing Powders. I really wanted to try Tim's painted metal technique that he used HERE on his April Tag , I have all of the Distress Paints except the Metallics so I cheated/improvised again LOL I dabbed Distress Paints in Greens and Blues with my finger as Tim did, and zapped them with the heat gun to dry the paint.
Then I took some Tarnished Brass Distress Stain and dabbed it on, again zapping it to dry it. The Distress Stain adhered perfectly to the Distress Paint, woohooooooo!
I then colored some of Tim's wonderful seam binding with Distress Stain in Iced Spruce and Gathered Twigs (2 of my favorite Stains!!) and added my metal pieces with one of Tim's long fasteners.
I was tempted to take a black sharpie and add my own blueprint doodles to it but was worried I'd mess it all up and I've run out of time :-)
Thank you for looking!
Sunday, April 21, 2013
12 Tags of 2013 with Tim Holtz-April
I can't believe that April is almost over! Spring is here in Southeast Arkansas, the Tulip Magnolia, Roses and Blackberry bushes in the yard are all in bloom and my Plum Trees have itty bitty plums all over them! I love this time of year :-) I also love Tim's April Tag...if you haven't seen it, check it out HERE
Aren't his Blueprint stamps awesome?!! I don't own any of them yet so I chose to go with his Butterflies from the Papillon set. This is still one of my all time favorite Tim Holtz stamp sets. This was my first time using Tim's Distress Paints and I am hooked big time! The colors are amazing, they blend beautifully and they don't leave your surface feeling chalky or rough...Tim nailed it with these paints!
As soon as my set of Distress Paints came in I had to take a photo of them...love Instagram! I still need to get the 3 Metallic Distress Paints and my collection will be complete.
I laid some distress paint down on my craft mat, spritzed some water onto the pain then pulled my Tag through the paint. I used my heat gun to dry the tag then laid some metallic distress stain on my mat and pulled the tag through it. Once it was all dry I used a blending tool and applied some distress ink over the tag in blues, greens and browns, spritzed with water, let the water drips flow down the tag and applied the heat gun again. I stamped the tag with Tim's Grid stamp from the Mixed Media stamp set then stamped the Butterflies from his Papillon set. I stamped the Butterflies again onto some Wendy Vecchi Clearly For Art Whiteout (I don't have the Clear one yet), cut the Butterflies out and colored the Butterfly in with Aged Mahogany Distress Marker. I applied the heat gun to the Butterfly to help dry the ink and marker, as well as to help bend the wings. I then glued the body portion of the butterfly to the tag using glossy accents. I took some of Tim's trim, applied distress paint and distress stain to it and looped it through the tag.
I was going to add a bunch of embellishments but changed my mind, I love the colorful simplicity of this Tag.
Thank you for looking!
Aren't his Blueprint stamps awesome?!! I don't own any of them yet so I chose to go with his Butterflies from the Papillon set. This is still one of my all time favorite Tim Holtz stamp sets. This was my first time using Tim's Distress Paints and I am hooked big time! The colors are amazing, they blend beautifully and they don't leave your surface feeling chalky or rough...Tim nailed it with these paints!
As soon as my set of Distress Paints came in I had to take a photo of them...love Instagram! I still need to get the 3 Metallic Distress Paints and my collection will be complete.
I laid some distress paint down on my craft mat, spritzed some water onto the pain then pulled my Tag through the paint. I used my heat gun to dry the tag then laid some metallic distress stain on my mat and pulled the tag through it. Once it was all dry I used a blending tool and applied some distress ink over the tag in blues, greens and browns, spritzed with water, let the water drips flow down the tag and applied the heat gun again. I stamped the tag with Tim's Grid stamp from the Mixed Media stamp set then stamped the Butterflies from his Papillon set. I stamped the Butterflies again onto some Wendy Vecchi Clearly For Art Whiteout (I don't have the Clear one yet), cut the Butterflies out and colored the Butterfly in with Aged Mahogany Distress Marker. I applied the heat gun to the Butterfly to help dry the ink and marker, as well as to help bend the wings. I then glued the body portion of the butterfly to the tag using glossy accents. I took some of Tim's trim, applied distress paint and distress stain to it and looped it through the tag.
I was going to add a bunch of embellishments but changed my mind, I love the colorful simplicity of this Tag.
Thank you for looking!
Subscribe to:
Posts (Atom)


.jpg)
.jpg)


.jpg)
.jpg)
.jpg)
.jpg)